Digital Camera Modes in a DSLR :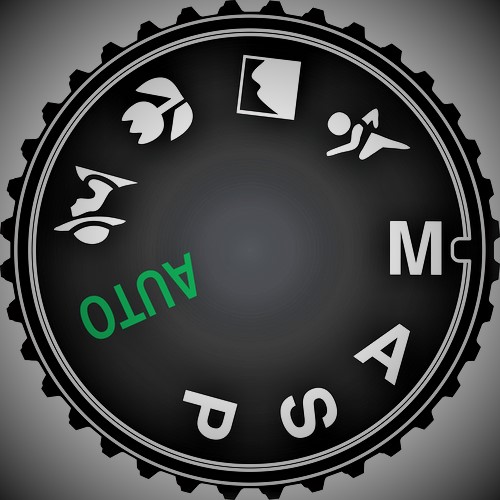
One of the main advantages of having DSLR is Flexibility. There are multiple modes provided by camera manufacturer which can make a real differences in quality of images. Its just that you should know which mode is best suited for the particular scenario and accordingly you can jump on this mode or setting and shoot. This also helps when you don’t have enough time to adjust your setting manually and you don’t want that moment to go by.
Here I will be explaining different camera modes provided in DSLR and what each mode does to your camera setting. To start with, to switch between different modes you need to rotate the camera dial on top with letters written on it like Auto, P, A (or AV), S (or TV), and M. You can just move the dial and mode will get activated in your camera automatically.
Let’s start :
1. Automatic Mode:
This mode does exactly what it says. Everything will be decided by your camera. From you aperture to ISO and shutter speed, everything is set by camera itself. You just have to click shutter button to shoot any subject. This will also turn on your flash if your camera thinks the lighting is not enough. This is more like point n shoot camera functionality. This mode is particularly helpful when you want to photograph something very quickly but you don’t have time to set each things separately. This mode is generally represented b green color.
2. Programmed Auto / Program Mode (P) :
When this mode is selected, camera sets the Shutter speed and Aperture itself to achieve what it believes is best possible exposure for metering information. This is a bit different than the Auto mode. Here camera doesn’t automatically pops up or white balance changes or ISO increases. This is often called as Semi auto mode where you have few things in your control but not everything.
This mode is helpful when you want to shoot something quickly and you don’t want flash to fire automatically. Here instead of that you want to bump up ISO by 600-800 to get the good enough shot. Often this mode is quite useful for beginners to start exploring different features of a camera.
3. Aperture Priority Mode (A or AV)
In Aperture Priority Mode, you have control over setting the aperture or f-stop. This way you can control the amount of light entering into camera and also the controls the DOF (depth of field) effect generated by lens. We should use A or Av mode when we want control over lighting and also the Bokeh effect of a subject. A bigger opening of aperture will create a great Bokeh effect and small opening will keep everything in focus. This mode is useful while shooting a stationary image that will not be affected by shutter speed.
Move the command to A or Av to set your DSLR on Aperture mode and then rotate the command dial to get the desired value of Aperture.
4. Shutter Priority Mode (S or TV)
When you try to eliminate blur from your shot or photographing any fast moving subject or you want to capture motion, then shutter priority mode is the perfect mode for that scene. This mode is also suited for slow shutter photography or long exposures where shutter keeps open for longer duration of time like 5sec – 30sec.
In this mode you will have control over the shutter speed and camera will set the aperture and ISO setting. Shutter Priority Mode is especially useful with sports and wildlife photography. For more on this subject click here …. Capture Motion and Moving Subject
5. Manual Mode (M)
This camera mode will take you back to the early days where everything in a camera was manual. And photographers change the different settings of camera to get the desired result. Most pro-photographers use this mode coz it gives control over everything in your camera like white balance, ISO, metering, focusing type or shutter speed.. Everything.
This is also the toughest mode to use because of obvious reasons. You should have a in-depth knowledge of every aspects of photography, relation between each function of a DSLR specially among Aperture, shutter speed and ISO. There are some scenarios where nothing works except Manual mode. While doing night photography camera could not decide which is best metering mode or focusing technique and exposure meter not able to decide which mode is best for this scene? In these types of scenarios we need to use the Manual mode of a camera.
This is toughest mode to use, hence beginners find it difficult to relate each n every functionalities of a DSLR. I would suggest try different auto modes first individually and once you are comfortable then you can jump of manual mode.
6. Scene Modes (SCN)
Scene modes are sub types of AUTOMATIC Mode where camera decides everything. This mode is usually denoted in dial marked with SCN. With multiple pictures on dial like a running kid for sports theme, a mountain for landscape, a flower for macro or a lady with hat for a portrait photography (specific to Nikon DSLRs).
These modes were initially quite infamous with point and shoot cameras because it was giving user to shoot picture straight away according to scene without any change in setting. This also helps inexperienced photographers migrate to the more advanced camera. However, once you get use of a DSLR camera, you will find SCN mode is not really helpful and you better shoot in a AUTO mode rather than SCN specific mode.
Conclusion :
Now, Which mode should we use ? This is entirely on individual which mode he/she prefers shooting. There is no specific case defined that this mode is best. Every mode has its own advantages and disadvantages. Now, which mode should we use? This is entirely on individual which mode he/she prefers shooting. There is no specific case defined that this mode is best. Every mode has its own advantages and disadvantages.
Suppose you are shooting a landscape in a cloudy condition. Here the first thing you need to take care of Aperture, so you will choose Aperture mode or Av mode in your camera. You cannot open your lens to f/1.8 or f/1.2 to get the maximum light, if you do this you will not get everything in focus. For landscape you have to use f/10.0 – f/16.0 to get everything in focus. At this aperture lens doesn’t allow much light to reach to sensor. So now, to compensate you have set your shutter speed, if you have a tripod then you can afford to slow down shutter below 1/60 to get enough light but if you are shooting handheld then 1/60 is the lowest shutter speed one can shoot, below this camera can shake. Now click picture, if image is ok that well n good, if it’s still dark then you need to use 3rd pillar which is ISO. You can increase ISO by 400 or 500 to keep shot clear n sharp enough without introducing much noise.
This is just a example, if you know about photography you can decide easily what to use in which situations. No single mode will work for all photographs so never be afraid of changing your setting and Keep clicking 🙂
Did you enjoy this article? Please share it! 🙂
Nice article.
Thanks for sharing.
Thanks Greg