This is the third pillar in Photography, others two are Aperture and Shutter speed. Its is one of the three components which controls exposure or the amount of light which reaches to image sensor inside camera. It has international standard to measure sensitivity meter across all cameras.
ISO is the measure of the camera’s sensitivity to light. The lower it is, the less sensitive your camera is to light, and vice versa.
Sensor captures more light if sensitivity meter is set high and if its kept at low number then it would be less sensitive to light. That’s why higher ISO help in low-light photography while in good lighting condition we should opt for low ISO number. Its just a number which signifies how much your sensor is sensitive to light.
With increased sensitivity, your camera sensor can capture images in low-light environments without having to use a flash. But higher sensitivity comes at an expense – it adds grain or “noise” to the pictures.
Hence, its always a good practice to keep the ISO as low as possible until you have no other options.
Lower ISO number = Crystal Sharp picture but lighting should be adequate.
Higher ISO number = We use it when lighting is not good, It also introduces grain in pictures.
ISO In Photography :
ISO setting starts from 100 in most of the cameras, in some it starts from 50. These two could be the minimum value for ISO any camera can have. Further ISO numbers are exactly double of its previous numbers like :ISO 100, ISO 200, ISO 400, ISO 800, ISO 1600, ISO 3200,ISO 6400,ISO 12800
How to decide ISO:
High ISO setting generally one should avoid, keep your ISO value as minimum as needed. We should use it generally when we don’t want to change value of Aperture and Shutter speed while shooting. In that case this third pillar comes in picture. You can increase ISO number to the point where picture in sharp and clear. The more high ISO number, the more grain and noise in picture.
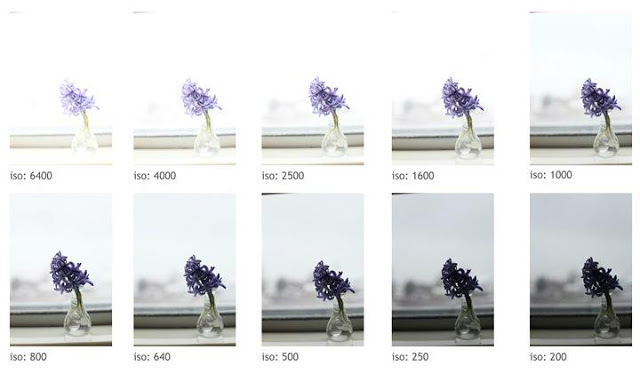
Sample Image:
High ISO :

If you see this image closely, you can observe the amount of noise is quite heavy all over the pic.
That’s because of the high ISO i.e. 3200
Low ISO :
Here image is quite sharper and clearer than the above one due to low ISO number i.e. 200
Tips:
Use it only as last option when you don’t want to change any setting.
Lower ISO : Keep it as low as possible. Less grain and less noise.
Higher ISO : Use it in extremely low light situation. Grainy and Noisy image.
Nice Camera tips and techie all posts ….keep it up